
Tube Testers Guide
An Idiots Guide to Tube Testers
There are few certainties in life. Death and taxes are two good examples. Another is that if we read it in a book (or on a website) many of us assume it must be true. And, as soon as one famous tube ‘guru’ espouses the virtues of anything, the demand and the price will surely skyrocket. Tube theory books like The Radiotron Designer’s Handbook (4th Edition) will command a fairly high price on the open market today because of this purported ‘supply and demand’. Yet I had no trouble finding a dozen copies for sale whilst surfing the internet for only an hour on a lazy Sunday afternoon. The same applies to RCA receiving tube manuals, and it’s moving up to tube testers themselves now, too. The same tube tester the original owner meant to send to the city dump 30 years ago is now heralded as ‘vintage’ and fetching literally hundreds, if not thousands, of dollars on eBay. I suspect it is mostly ‘new comers’ who pay these ludicrous prices (‘I wannabe a biker; how much for a Harley?’) and just drive up the prices for the rest of us. The next time you look at tube testers on eBay, make a note of the people ‘winning’ and paying the high prices; ‘beginners’ with a very low ‘feedback’ rating. The veterans are not involved here, except as the sellers, fleecing the freshmen tube jockey. So, before you shell out $400 or more for that old tube tester, read this ‘Lesson’ carefully. I’ll help you out by giving you as many pointers as I can to maybe stave off you having to walk to work for a month to help pay for something not suitable for your purposes, however misguided they may be. Collective brands are available as a separate ‘link’. Remember that ‘Vintage Advertising’ bit on home training courses? There are plenty of retired TV repairmen around, and many have ‘junked’ their old equipment. But many haven’t, and ham radio flea markets are a great source for finding these tube testers, rather than eBay. I have more than a handful of tube testers, of all types and brands, and haven’t paid more than $75 for any of them. Some were even given to me by TV repair shops that decided years ago to get out of servicing tube TV sets. Other shops did not like using a tube tester after the second or third time the tester ‘lied’ to them. Keep looking and you may get ‘lucky’, too. I started collecting tube testers at first mainly to have a ‘back up’ unit, and lately my collection is getting bigger just to for the sake of collecting ‘something’. There are still plenty of tube testers out there for me or you to collect. Remember that tube testers in their day were very expensive, and few people ‘threw out’ something they spent an entire paycheck on. Along the journey we’ll check out some vintage tube tester advertising, and see just how the service industry looked at this piece of test equipment.

The purpose of the tube tester today is make money for the person selling the tester on eBay.
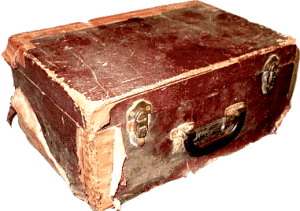
The first thing to keep in mind is that there is not enough space here (or anywhere else, for that matter) to recount an entire history of the venerable tube tester. There were tube testers the day after the tubes themselves were invented, and they ranged from the ‘very crude’ to the ‘moderately crude’. These are not really sought after today, except for the local Radio Museum. Of course, tubes were used for communication purposes during the war years, and the radio ‘field operator’ needed to be able to test his vacuum tubes. These testers were typically limited to a very select few tubes, and used the soldier’s radio battery to bias the tube to be tested. However, we are concerned here with the tube tester types your modern gurus are interested in, and those we see regularly on eBay. The simplest tube ‘tester’ is nothing more than a filament continuity indicator. These work only for saving time when servicing tube radios and TV’s with series-connected filaments. Don’t waste your time with these, they are only worth while as a collectible, not to actually use. Even as a collectible, I wouldn’t pay more than $1 for one. There were literally thousands of different ‘brands’ of these types of testers, although they all looked similar. One of my own examples is shown below.
 Simple continuity tester has serious drawbacks.
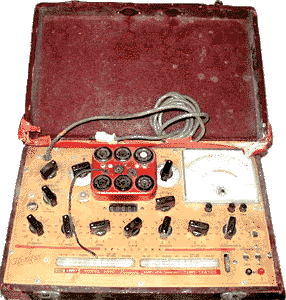
The neon bulb is powered by 115/120VAC and the low resistance tube filament completes the circuit. Big deal. An ohm-meter will tell you the same thing. You may note the 7027 tube above testing ‘GOOD’ by virtue of the completed circuit firing the neon bulb. Well, look again at the photo carefully. It may become obvious that the entire glass is missing from the tube! I do this every once and awhile to really check out tube manufacturing practices. By taking a caliper to the plates of various tubes I can tell the modern Russian and Chinese tube have thinner plate material. Anyway, it’s fun to dismantle tubes to learn about construction techniques, and even use a ‘cadaver’ to illustrate the inadequacies of the filament continuity tester. (P.S. A completely shorted tube would test ‘GOOD’ on this device as well.) Next came slightly advanced testers which checked the ’emission’ of the tube. Basically they turn all tubes into diodes, by shorting any and all grids to the plate. Then they measure the current flowing through this virtual diode by sticking an ammeter in series with either the plate or the cathode. Older testers may call themselves ‘Plate Conductance’ if the ammeter is in series with the plate, or ‘Cathode Conductance’ if the meter is in series with the cathode1. The ‘reading’ would be exactly the same either way. Below is my own personal Eico Model 635 emission tester. Other Eico tube testers can be seen HERE.

My Eico Model 635 Emission Tester.

Note adapter to ‘test’ television CRT tubes. Other popular brand names would include Heath, Knight, Dyna, and Lafayette, all of whom sold kits for the experimenter to build at home, or as factory-assembled units. You should be able to tell at first glance whether or not the tube tester you are interested in is probably an emission tester. To see a photo-gallery of more emission tester examples, SEE HERE. There are a few problems with using any emission tester. Your first thought may be that since any tube is essentially an electron-emitting device, a check of the tube’s cathode emission would be a valid test of that particular tube. However, most tubes other that diodes depend on the control of the electron flow rather than the amount of electron flow. This important shortcoming means that they all miss the output tube with a cathode ‘hot spot’ which is hidden by tying the grids to the plate. When a cathode has a ‘hot spot’ most of the emission current stems from this restricted area on the cathode. A control grid does not have the proper valving action under this condition2. Put that EL34 back in your Marshall and the tube quickly turns a nice cherry red color. “But my emission tester said the EL34 was ‘Good’. Why?” Now you know. Also, cheaper emission testers used a low-current power supply. Testing a 5U4, as an example, can be problematic; a hypothetical 100mA power supply tests the tube, and the emission is sufficient enough to display a ‘GOOD’ reading. However, when placed in an amplifier that tries to draw 150mA or 200mA, the tube would not provide enough current, and the equipment would not operate at peak efficiency. The ‘better’ emission tester advertised that it tested the tube ‘under rated load’, meaning it utilized a higher test voltage/current. The Sencore line of ‘Mighty Mite’ tube testers is the first name that comes to my mind when I think of ‘better’ emission testers. To see a sample of Sencore advertising, and a pair of their transconductance tube testers, SEE HERE. Lastly, as you should have read in your RCA Tube Manual… “the emission test is subject to limitations because it tests the tube under static conditions and does not take into account the actual operation of the tube… capable of such large emission that the tube will often operate satisfactorily after the emission has fallen far below the original value.3”
The test voltage in most (emission) testers is 30V RMS; this is only a compromise which is far from the optimum for all cases.
Radiotron Designer’s Handbook, 4th Edition, Page 123.
Simple emission testers could only lose their status as the preferred piece of equipment when ‘mutual conductance’ testers became available. These testers usually work by applying an AC signal on the control grid of the tube (triode/tetrode/pentode) and measuring the AC signal on the plate, while maintaining DC voltages on the Plate and Screen Grid. The Cathode can be biased with a small positive voltage, or the Control Grid can have a small negative DC voltage. This setup actually measures the AC gain of the tube, rather than the actual ‘transconductance’. However, rectifier tubes can still only be tested for emission. After calibrating the settings to establish a ‘proper’ scale deflection on the meter, readings are compared to established averages for that particular tube. There are a few simple variations on the intricacies of any mutual conductance tester. Most testers transformer-coupled the line frequency (60Hz) as the input test signal. Others used a 4 kHz or 5kHz oscillator signal, which many feel is a ‘better’ method. Using 4kHz or 5kHz as your test signal ensures your reading is only concerned with the AC signal portion at the plate of the tube under test. Some testers used a ‘tuned’ circuit to feed the meter, to really avoid parasitic oscillations causing faulty readings (as well as the possibility of the meter movement loading down the test signal!). Even Hickok was known to install ferrite beads in their later-day testers. Whether or not this has any affect on the readings is worth investigating, but I still believe a 4kHz or 5kHz test signal is more ‘realistic’ than using the 60Hz line frequency. A variation on a theme is the ‘grid shift’ approach. Rather than an AC signal, pressing the ‘Test’ button lowers (or ‘shifts’) the DC voltage on the grid (usually by 1-volt) and the change in plate current is measured. Theory tells us the transconductance is the ratio of change in grid potential to the change in plate current. This is also referred to as a ‘static’ test. Engineers believe the AC (or ‘dynamic’) method is superior because it reflects true RMS values, regardless of waveform distortion. If the line voltage should not be a true sine wave (as in heavily industrialized areas), the dynamic tester will nonetheless indicate correct current values. Many lower-priced ‘conductance’ testers apply AC to all tube elements (Plate/Screen/Control Grid) rather than AC to the Control Grid and DC to the Plate and Screen Grid. An AC voltage on all of the elements can actually damage high transconductance tubes. The heavy rectification current caused by driving the Grid positive can overheat the Grid wires, resulting in critical spacings to become upset. The tube then actually loses transconductance4. Higher-end ‘conductance’ testers also included a provision for plugging in a set of headphones and even ‘listening’ to the tube while you are testing it! This lets you check the tube for microphonics. The easiest way to tell what you’ve got (without a schematic of your tube tester in front of you) is to ‘look under the hood’. If you see something akin to a tube type ’83’ rectifier and a 6BN8 (a common tube compliment in B&K tube testers) or a 5Y3 (as seen in most Hickok tube testers) you probably have an older dynamic mutual-conductance tester. The triode tube may also have a diode or two inside to rectify the output signal for a DC meter movement, although many testers use an AC meter movement. And the rectifier was almost always a type that gave a pretty regulated voltage (‘constant voltage’) regardless of the current fluctuations. Other testers, such as Eico, had a bias supply inside, where you’ll see the diode and filter capacitor somewhere. Plus, you’ll often see adjustment potentiometers to calibrate transconductance testers. Emission testers will have just switches and an assortment of wires that resembles a plate of spaghetti. Referring back to that statement about how engineers favor ‘dynamic’ testers over ‘static’ testers because the ‘dynamic’ test will reflect true RMS values; according to the book Principals of Electron Tubes (Herbert J. Reich)….. “the characteristics obtained with alternating voltages differ from those obtained with direct voltages only when the frequency is so high that tube capacitances and electron transit time cause appreciable out-of-phase components of current (page 54).” Now Herbert is referring to tube characteristic curves (and how they are obtained), not tube testers. I still thought that statement means something, I’m just not 100% sure if it matters to us right here and now.
The ultimate test for any tube is still the actual amplifier you’re putting the tube into.
Some old Nobody.
Mutual conductance testers were pretty expensive in their day. Even towards the end of the tube era for radio and television, owing a transconductance tube tester was often a luxury. To convince themselves that owning such a tube tester was no big deal, many old time tube technicians began believing that the only ‘real’ test was tube substitution. That way you were testing real tubes in real circuits under real voltages. This is often very true, but sometimes a transconductance tube tester comes in handy, especially those with a ‘Life Test’ feature. This lets you measure the gain of the tube as you lower the filament voltage by about 10%. If the gain remains ‘rock solid’, you have a tube with a good amount of ‘juice’ left in it. Should your tube tester not have a ‘Life Test’ function, you can simulate this effect by measuring the conductance as you lower the filament voltage via the selector switch. As an example, for a 6L6 you would hold the ‘Test’ button down with one hand, and with the other hand rotate the filament voltage switch from ‘6.3’ down to ‘5’. If the transconductance (measured in micromhos) remains pretty consistent, you should have a good tube. Of course the tube may still be microphonic, but that is another story. Another way certain emission tester manufacturers fought back is with their ‘dynamic’ conductance testers. The word ‘mutual’ does not appear on these testers, and for a good reason; they are still emission testers. Keep in mind that patents were held for the transconductance circuit by Hickok exclusively, and licensing was prohibitively expensive for many small manufacturers. Jackson patented their own circuit; by applying proportional AC voltages to the tube elements, the ‘virtual diode’ was circumvented, along with its’ shortcomings. I have a hunch this idea works very well, but other ‘authorities’ disagree. Below is a Jackson Model 648 ‘dynamic’ conductance tester, a high quality unit in its’ day. You may note that while it has just a few pre-wired tube sockets to choose from, control settings may take a minute or two, and the set-up chart seen at the top is essential to have for proper usage. I’ve seen many tube testers for sale missing the owner’s manual or the set-up charts! I would advise against buying these, as you never know the set-up procedure. You may find the manual or set-up chart (also called ‘roll-chart’) for sale separately, but the gamble still makes me think twice about paying for the tester alone. To see other Jackson tube testers SEE HERE. In a minute or two you will have a chance to view ‘Vintage Advertising’ for the Jackson 648. The same circuit principal was employed by Eico for their 666/667 tube testers, and we will also visit those testers/advertisements in just a manner of moments.

Jackson Model 648 Tube Tester. An excellent choice, as long as the manual is intact.
The number one name in vintage and collectible tube testers would have to be Hickok. Unknown to most people is that Hickok made VOMs, TV alignment generators, and oscilloscopes as well as tube testers. The Hickok factory also kept their artisan elves quite busy, having them build tube testers for other people, such as Western Electric, Philco, and Stark on the weekends. These testers will always have a designation somewhere on the panel stating that the tester you have was made under license of Hickok. It is always the same Hickok circuit (83 and 5Y3 tubes to supply unfiltered DC) and the ‘Sensitivity’ control is dubbed ‘English’. Below is my Stark Model 9-66, one of my ‘go-to’ testers. This ‘almost Hickok 533A’ was procured from the Government of Canada, proof that it saw little use. These are a very popular tester to find in Canada, and I own four 9-66’s as I write this (I’ve passed up others, and traded away even more). And, just like Hickok, no Stark tester is as quick to use as my B&K or Eico testers, as seven of the rotary switches have to be completely reset to check each section of a tube like the 12AX7. Hickok did eventually make it easier to test dual section tubes, when they introduced the model 752. If the thought of attempting to maintain and troubleshoot your own Hickok-style tube tester does not make you shudder, you can prove just how brave you are by HERE. If you would like to witness a few more samples of Stark tube testers, you can easily do so by simply looking HERE.
 Much as Chrysler manufactured Dodge automobiles, Hickok manufactured Stark tube testers.

To give you an idea on just expensive Hickok tube testers were in ‘their day’, check out the advertisements from the electronics magazines of yesterday by looking HERE.

You be da’ judge of this one!
As merely a single example of how crazy the world is becoming, and in particular those who fancy themselves tube technicians, we need only to look to the (in)breeding ground of insanity; eBay. Below is a picture of a Hickok Model 539c mutual-conductance tube tester.

An excellent tube tester, if food and shelter are not your primary concern.

This unit is regularly auctioned via eBay. A short while ago one sold for $1,058US. Just recently one sold for $1,355US! The ‘champion’ weighed in at $1,700US. Please, no heart attacks on my watch, OK? Granted, these are quality tube testers in immaculate condition with all the manuals, as well as being a very desired collectible. There are, however, many 539 tube testers out there; they were manufactured for about 30 years! And, I still did not pay $1,058US for twelve of the tube testers in my collection. Many people reading this page will consider themselves lucky to have a job that allows them to take home $1,058 in a month. Equally as preposterous is the bidding on tube testers not in the most presentable of conditions, or even functioning. Consider the photographs below.

I’ve heard looks aren’t everything, but they have to count for at least something, wouldn’t you think?

Through the magic of on-line auctioning, this sorry example of a Hickok 6000A recently fetched $113.01US. More than likely it was used for parts to repair an otherwise immaculate Hickok tester, but you just never know these days. That must still seem like a bargain compared to the money offered for more presentable examples. I have witnessed the same model sold for anywhere between $350US and $700US, for a pristine example with all appropriate manuals. It’s your money, you can spend it as you see fit. I would still like to eat at least once a day, and not have to explain to my wife where the mortgage payment went. You can learn a lot by studying old tube tester advertisements. So, let’s do just that. Look out for links to take you to full pages of advertising from B&K, Hickok, and Sencore. These link pages will have a multitude of advertisements showing various models from these manufacturers. The following advertisements on this page are ‘singles’, but will still show you how they compare to the others for price and features. The thumbnails below can be linked to full-size advertising by clicking the appropriate picture.


Clicking on the appropriate picture will take you to ‘full-size’ advertising.
A very popular tube tester to see on eBay is the Eico 666, which can be seen above left. These are popular to the point that some people are auctioning off the instructions manuals separately. Another very popular tube tester to find for auction through eBay is the Jackson 648, which can be seen above center. There appeared to be many variations of this model, and the case stylings changed somewhat over the years. And finally, we have the Seco 107. This appears to be a recent discovery, as their ‘prior’ existence went largely unknown.
The next group of tube tester advertising starts off with the Superior TV-12 (above left). It is a very popular tester to find on eBay, and deservedly so. I really like the solid oak cabinet, and if it is in good shape, looks quite stunning. The TV-12 is a transconductance tester, unlike its’ equally common sibling, the emission tester TV-11. Surprisingly, they both command about the same price, although the TV-12 is clearly the preferred unit. Above center we have advertising for a trio of Mercury tube testers. These do show up on eBay frequently, but watch the model numbers. The Model 1100 is very common, but is an emission tester. The Model 1000 is seen far less, but is far more preferable. And, above right is one of my personal favorites; the Precise 111 tester. Read up on the advertising, and find out why I’m inclined to use this as one of my ‘go-to’ testers. Finally, here are the strangest tube testers I have ever seen. Designed for Homer Simpson, these are the lazy man’s ‘wet dream’ tube testers. You simply plug the tube into its designated socket, and then plug in a punched card corresponding to that tube type. Typically, a multiple-contact sandwich switch achieves ‘proper’ settings, including filament voltage, plate/screen/grid connections, and bias voltage. The final reading can be obtained in about 5 or 10 seconds! Small ‘plungers’, resembling copper nails, push through copper sleeves to make contact with other copper sleeves. If there is a hole in the card over any given switch plunger, it will not be pushed through to the bottom sleeve, and the switch remains open. In positions where the card is not punched, it bears down on the switch plunger and closes the circuit. Although you’ll have to keep tabs on literally thousands of cards, at least the instructions are permanently mounted to the front panel. Let’s now look at a few ‘Cardmatic’ tube testers.
 With a name like ‘Hickok’, you know it’s gotta be good.

First up is the Hickok 123A. If it appears that a section of the case, as large as the actual tester itself, is used to house a plethora of test cards, your eyes are not playing tricks on you. There are numerous versions of the ‘Cardmatic’, and other websites will have more complete information on differentiating the similar models. While Hickok tube testers are considered the premier name in high quality testers, Cardmatics are definitely seldom seen models with technicians and old radio/TV repairmen. It is mostly collectors who like to flaunt what they have. Your average ‘technician’ probably does not have a bankroll large enough to afford a Hickok Cardmatic. If you do feel like throwing caution to the wind, and buying any of the Hickok Cardmatic tube testers, here are a few cautions. These are very complicated circuits, with multiple regulated power supplies. Therefore, make sure you have the ‘proper’ manual to calibrate the unit, and know exactly what the Hell you are doing. They are very large and cumbersome, so have a very large test bench. On the ‘plus’ side, like most ‘regular’ Hickok tube testers I see, these older units will have the provision to test old radio tubes with 4/5/6 pins, and are thusly sought after by vintage radio collectors. I have found more than a few websites devoted to Hickok tube testers, which can be found be checking out the Hickok advertising page linked to up above. The ‘Cardmatic’ concept is duplicated by those darn artisan elves under the moniker Western Electric, as shown below.
 This Western Electric tube tester was good, but still no match for the mighty Hickok!

The KS-15874 above is a newer version, and there are obvious updates to the styling (KS was the designation referring to Kearny Specification). The ‘plunger’ section (with the card slot) is duplicated verbatim, but the tube socket ‘platform’ and the four fuses on separate panel should jump out at you right away. The Western Electric models command as a high a ‘sale’ price as their Hickok brethren, and in some ways are more preferable. As in buying a used car, the Western Electric models would absolutely have much lower ‘mileage’ on them, and be in far better condition. This is due to the observation that any Western Electric tube tester was manufactured to be used ‘in house’ by Western Electric engineers only, and thus were not sold to the general public. They should therefore be well maintained, in comparison to Hickok testers used ‘in the field’.
 When slacker’s dream, they dream of the RCA Model WT-110A Automatic Tube Tester.

Of course RCA will simply not let anyone outdo them, regardless of how off-the-wall the idea is. RCA released the WT-110A AUTOMATIC ELECTRON TUBE TESTER shortly after. Seldom seen in books or on websites, this is a very rare piece of test equipment. I could only find three ‘useable’ examples of vintage magazine advertising for this model. The WT110A will test both sections of a 12AX7 with the same punch card. To do that, you simple select which plate the ammeter is placed in series with. Triple triodes, like the 6K11, can also be tested with the same punch card. It is fast and easy, but RCA uses simple heavy paper cards, where Hickok uses thin plastic cards, which can be washed. My RCA punch cards are very dirty, and cannot be cleaned. The WT-110A was advertised around 1957; with an ‘It’s New’ announcement similar to the following;
A new approach in fast, accurate tube testing, the WT-110 AUTOMATIC Electron-Tube tester utilizes punched cards…..Complete transconductance test-set-up takes only seconds…..The WT-110A tests for gas, shorts, interelectrode leakage and over-all tube quality. Designed especially for TV and general electron-tube testing. List $199.50.
The WT-110A is one of those testers that utilize DC voltages for the plates/screens/bias and an AC voltage for the test signal. There is a pretty simple power supply inside (not regulated at all), and I suggest you change all the filter capacitors. As a hint, there is one ‘hidden’ underneath the chassis! The selenium rectifiers should be checked for leakage, and possibly changed as well. There are mods to reduce the B+ increase that occurs when switching from selenium to silicon rectifiers, and if you’re interested in learning any, email me. All switching is done via contact pins and bus bars, the ‘opposite’ of how Hickok achieves making connections. The lever slides the contact pins along to make appropriate connections. You should keep these contact paths clean for maximum performance. I really don’t know how the paper card prevents ‘pins’ from poking right through, but apparently it does just that. For a peek at those painfully rare magazine advertisements for the RCA WT110-A, see HERE. Here we have a very seldom seen brand of ‘automatic’ tube tester. Up until now, I had mentioned here that I did recall seeing other brand names, but could not recall them specifically; I suspected they were simply ‘rebrands’. Well, I have now witnessed four examples of the TeleTest/DynaMatic tube tester during the last year, and I bought one of them! My ‘newest’ automatic tube tester is seen below.
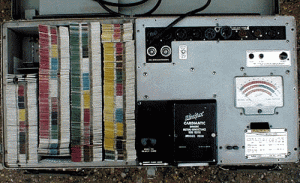
 DynaMatic tube tester has its’ limitations, but is still a very compact tube tester that works well.

Manufactured by the TeleTest Instrument Corporation, located in New York, this tester has it’s pros and cons. On the ‘good’ side, it is so small that it takes up absolutely no room on your bench. It sets up very quickly, and is simple to use. The test voltages are very good; approximately 150VDC on the Plate and Screen Grid, and a reasonable 1VAC test signal. On the down side? Well, there is just the three test sockets; for 7-pin, octal, and 9-pin tubes. The set-up cards are a 1/8″ thick Bakelite, and are prone to cracking or breaking into pieces if handles roughly. It is still a pretty nifty little tester, and a nice addition to my collection.
 Although the B&K Model 675 ‘Dyna-Quik’ is equally as labor-nonintensive to use, it was never as popular.

And finally, the B&K 675 rounds out the gathering of Slacker’s Tube Testers (a sample advertisement for this tube tester was seen earlier above). This one was never as popular as the Hickok or RCA (although none were ever all that popular to begin with, except with the military), and is a pretty rare find. It will even test transistors. In all of my B&K catalogs and magazine advertisements the Model 675 is only mentioned once. I also have the little sister to the 675; the 685. The 685 is an odd-ball in that the cards are used only to test obsolete tubes with an emission test; popular tubes are tested for transconductance exactly as with a 500/550/650/700/707/747. You will rarely see any of these ‘automatic’ testers at ham radio swap meets today, and because pin contacts and push button switches are prone to getting dirty or corroded after sitting in the attic for 50 years, I wouldn’t bother hunting any one of these units down. I only own one (or three) for the novelty factor of showing my friends the tester in action. Other B&K tube testers and advertising can be seen HERE. If and when you are ever out shopping for a tube tester, keep these things in mind:
- You probably don’t ‘need’ a tube tester, although to ‘want’ a tube tester is a horse of quite a different color.
- Alan Douglas has written the only book about tube testers in the last 35 years. Entitled ‘Tube Testers and Classic Electronic Test Gear’, it is available from Antique Electronic Supply. It is as close to a reference guide as we will probably ever get, with an entire chapter devoted to tube curve tracers.
- No one tube tester brand is vastly superior to all others, as they are all happy compromises. There were literally hundreds of different makes of tube testers made, and you’ll always find a brand name you don’t know. It will still do as good a job as that B&K or Hickok. However…….
- The ultimate test is still the actual amplifier the tube will be used in.
- Older tube testers will have provision for testing 4/5/6 pin tubes. Newer models won’t have that capacity, but they can usually test 6K11’s (as one example for the Ampeg owners out there). Older radio repairmen needed to test 47’s, while TV repairmen couldn’t care less. It should therefore be obvious that who you get your tube tester from will often dictate what type of tester you get. Typically, the TV man who made mostly house calls will have an emission tester, while the shop technician who worked on your stereo will have a fancier conductance tester.
- It is not a bad idea at all to test the transconductance of your output tubes every once and a while to compare readings. Should the life test or conductance readings drop dramatically from previously performed tests, think about changing those tubes5. A lot of players think they can ‘hear’ the tube quality deteriorating. These people don’t need a tube tester.
- It is also a good idea to maintain your tube tester! This means clean and re-tension the sockets, and apply contact cleaner to the switches. This will help keep the unit performing at its’ peak level for a long time.
- Many tube testers came with an operating instruction booklet also explaining alignment and calibration procedures, and doing these usually really makes a difference. There is also a schematic to aid in future repairs and trouble shooting. You seldom find these because most old-timers insist that they never aligned or calibrated their tube testers and just got to know their unit and how much faith to put in any readings. You probably won’t find the instruction manual with tube testers for sale at the ham radio flea market, although you can find them (as well as the tube set-up charts) for auction on eBay. The last time I looked there were about a dozen copies of the operating manual for the Hickok Model 539c and 6000A for ‘sale’.
- Don’t get too upset when your tube tester declares a tube suitable for duty, and then the tube proceeds to blow fuses in your amplifier. Like they say; (sh)it happens.
- An interesting website took dozens of tube testers, including multiple examples of the Hickok 600 and the B&K 747, and tested one NOS 12AU7. All testers were carefully cleaned and calibrated. The results were very unsettling, but not all that surprising. Unfortunately, this website is no longer operational. That’s a crying shame, so I’ve condensed the writings, and included them HERE.
Please don’t construe this as an all-encompassing guide, or consider me to be any type of authority on tube testers (or anything else, for that matter). I realize I ‘left out’ Conar, Heathkit, Precision, Sylvania, Simpson, Triplett, and other tube tester manufacturers. This is because I don’t have ‘enough’ examples of these companies in my tube tester collection to offer valid opinions, and a further lack of ‘full-page’ advertising forces me to omit these companies. Perhaps for further ‘Updates’ I can provide some information on other tube tester companies, or a faithful reader can do my dirty work for me.
I often get asked to recommend a specific tube tester for the aspiring technician. While flattered that someone thinks I know enough about tube testers that I can tell you how to spend your money, this did get me thinking (I thought I smelled smoke!) about a few things. The following is a quick list of tube testers I would seriously consider if I were starting from square one again tomorrow. Keep in mind that you must take into account your budget, the type of repair work you are doing, and if you are interested in owing one and only one tube tester. As an example, someone restoring old radios cannot use a B&K 747B exclusively, but an aspiring guitar amplifier technician certainly could. Also, I list a few select tubes as seen in common vintage Ampeg and Gibson amplifiers. It would certainly be nice to be able to test these tubes, especially if you wish to service a variety of amplifiers. If you want to set yourself up specifically as ‘The Fender Doctor’, then you need not worry about testing a 6EU7. You get the idea; so now consider the following chart. If you would like to see me add a tube tester model to the chart, please let me know. Lastly, this chart does not take into account absolutely every tube tester ever made. I will concentrate on the testers you see more often on eBay or at the local Ham Radio Swap Meet, and those that should cost you less than the price of a small imported automobile. I’ve decided to add a ‘half-star’ rating; this is noted by the ‘+’ sign beside the star rating. As an example, if you see ‘**+’, that is simply a two-and-a-half star ‘rating’. This means the tester in question is an excellent primary unit, but some small concern prevents it from being ‘the best’. A rating of ‘***+’ means the tester in question is ‘better than the best’, in my opinion. Remember, this is just my opinion, and my ‘rating’ might certainly differ from yours. With that out of the way, let’s check out which tube testers will suit our needs better than others.


So, does this mean I consider the Jackson 648 as good a tube tester as a Hickok 539c? Of course not. However, each has shortcomings that results in both testers getting my similar ‘rating’. For the radio repairman, the Hickok 539c may be worth a ‘three-star’ rating (or higher), but for the guitar amplifier technician or audiophile there are a few tubes that are not listed on the roll chart. That is a shortcoming, regardless of how much you pay for your 539c. Remember; there is nothing ‘wrong’ with owning just a simple emission tester as your ‘one and only’. If you can learn to interpret the reading, you will probably get along just fine. But eventually you will have a yearning for a ‘better’ tester, and this guide will hopefully help you make a decision that does not come back to haunt you. If your repair work concentrates on old radios, as an example, a Heathkit IT17 will possibly serve you quite well, as would an Eico 666, or a Jackson 648. Even a guitar player who just wanted a quick and dirty check of his tubes could get by with the aforementioned tube testers. However, the guitar player or ‘weekend technician’ may want to match 12AX7 halves ‘a little better’, or try and match 6L6’s ‘less crudely’. This person is better off with any ‘true transconductance’ tube tester above marked with a double asterisk (**) or a triple asterisk (***). If you wish to service all makes and models of tube amplifiers, there are only a select few testers that can accommodate you. This is why it may be preferable to own ‘a few’ tube testers.
Sources
- Know Your Tube and Transistor Testers, Robert G. Middleton.
- RCA Receiving tube manual, RC-17 (page 252).
- Getting The Most Out Of Vacuum Tubes, Robert B. Tomer.
- Radiotron Designer’s Handbook, 4th Edition, F. Langford-Smith.

Regarding the static vs AC transconductance test: “This is also referred to as a ‘static’ test. Engineers believe the AC (or ‘dynamic’) method is superior because it reflects true RMS values, regardless of waveform distortion. If the line voltage should not be a true sine wave (as in heavily industrialized areas), the dynamic tester will nonetheless indicate correct current values. ”
I do not know which specific engineers touted the AC test, but the AC test is not as good as the static grid shift test, in my opinion, for these reasons: 1. Most static tests use filtered DC (the way I do it) and therefore eliminates and possibility of distorted mains waveforms. 2. Grid shift testing allows more flexibility in manually and accurately setting bias, screen and plate voltages. 3. The AC current in the AC test also passes through the non-linear curve of the tube, but the analog testers’ meter, as all analog DC meters, responds only to average current or voltage. It does not respond to true RMS of a sine wave.
I have read this synopsis of statis vs AC transconductance testing on the internet in other places, and as one trained in engineering, find it vague and inaccurate. In my experience, the best, albeit slowest, method of measuring true transconductance (gm) is by setting up the tube at the operationg point given in the tube manual’s specified “typical operating conditions” wher its mutual conductance is given, and using a filterd DC, vary the grid bias a small (perhaps =/- 0.5 to 1 volt) and set amount, while readjusting plate/screen votage as needed. A good DMM is excellent for accurate measurements. Dividing the change in plate current by the change in grid voltage x 1000000 = micromohs.
Hi. I’m amazed that I can NOT locate any info on RETMA-315, other than as mentioned in tube charts ! Even though retma is out of business, there’s not even archives .Tube charts refer to “use retma-315 to connect shield to Grid or Cathode ! WHAT ?
This is mysterious. Does anyone have the facts regarding this method or thing?